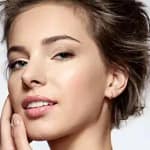
How To Do Smokey Eye Makeup? – Top 10 Tutorials
It’s time to ditch your fear of attempting smokey eyes—here’s all you need to be a pro!
While they may look pretty elusive in practice, smokey eye tutorials are simple. So, if you are someone who loves to go bold with their eyes occasionally, smokey eyes will be your signature and go-to look, and enhance your beauty even more!
Nowadays, you can easily access many smokey eye tutorials online to master the technique. However, the right technique and occasion are very important to get the look right as this bold-eye look may not go well with all your outfits. However, there is no doubt that the perfect smokey eye creates dimension and looks downright glamorous.
Also, you can do this loud eye makeup look in both dramatic and subtle ways. Doing it right may require a lot of trial and error, but there is nothing quite like it once you get it right. So, if you are a beginner and have never created a smokey eye look yourself, fret not. Keep reading to find out how you can master this art effortlessly!
Keep In Mind
- Lipstick Shades: Opt for light pink, classic red, peachy shades, as well as nude colors for a perfect look.
- Best Eye Shapes: Smokey eye makeup suits all eye shapes but looks phenomenal on almond eyes and monolid eyes.
- Best Makeup Tool: Use a crease blender or a blending brush for a salon-like smokey eyes look.
Top 10 Smokey Eye Makeup Tutorials(Step-By-Step)
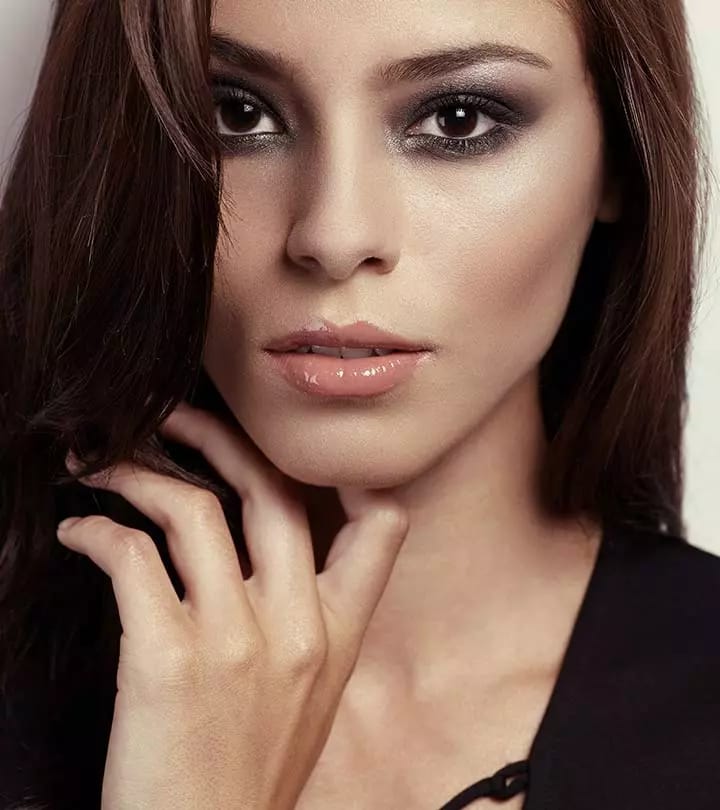
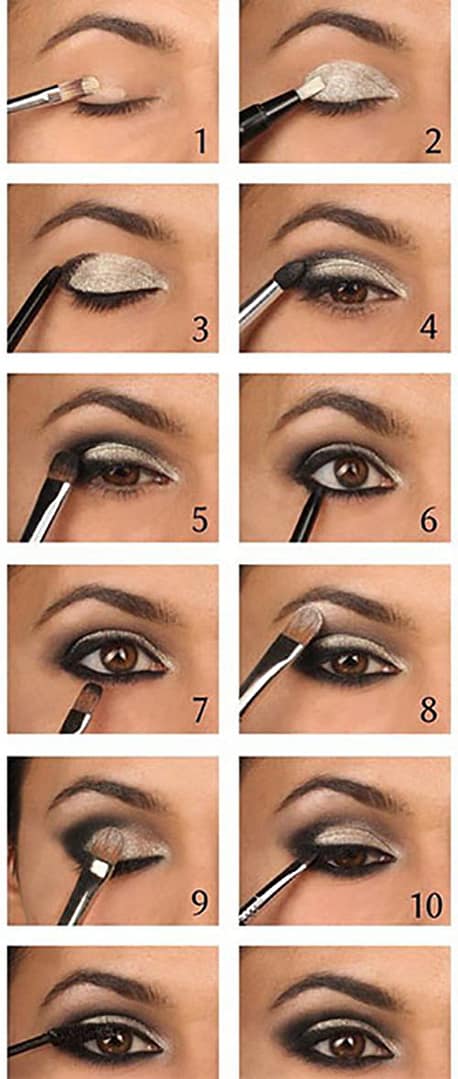
1. Black Smokey Eye Makeup Tutorial

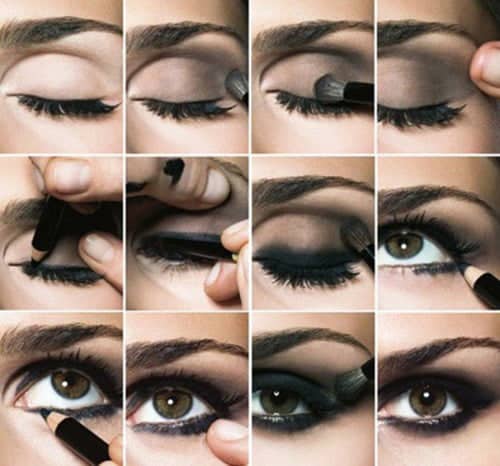
You Will Need
- Primer
- Concealer
- Black Eyeshadow
- Black liner
- Mascara
- Eyeshadow brushes
How To Apply Black Smokey Eye Makeup?
Step 1: Prepare Your Eyelids:
- Start with a clean, moisturized face.
- Apply an eyeshadow primer to your eyelids. This helps the eyeshadow stay in place and appear more vibrant.
Step 2: Apply Transition Shade
- Use a neutral brown or taupe eyeshadow as a transition shade. Apply it in the crease of your eyelid with a blending brush. This will help blend the black eyeshadow later.
Step 3: Apply Black Eyeshadow
- Take a flat eyeshadow brush and apply black eyeshadow to your entire eyelid, starting from the lash line and working your way up to the crease.
- Don’t worry about being too precise at this point; you’ll blend it later.
Step 4: Blend the Black Eyeshadow
- Use a clean blending brush to blend the black eyeshadow in the crease and along the edges to create a gradient effect.
- Blend until the edges are soft, and there are no harsh lines.
Step 5: Add Depth with Dark Gray or Charcoal
- Apply a dark gray or charcoal eyeshadow to the outer corner of your eyelid and into the crease. This adds depth and dimension to the smokey eye.
- Blend well to ensure a smooth transition between the black and gray shades.
Step 6: Line Your Eyes
- Apply black or dark brown eyeliner along your upper lash line. You can create a thick or thin line, depending on your preference.
- Optionally, apply eyeliner to your lower lash line as well, but keep it close to the lashes.
Step 7: Smudge the Eyeliner
- Use a smudging brush or a cotton swab to smudge and soften the eyeliner for a smoky effect.
Step 8: Curl Your Lashes and Apply Mascara
- Curl your eyelashes with an eyelash curler (if desired) to open up your eyes.
- Apply a few coats of mascara to your upper and lower lashes to finish the look.
Step 9: Clean Up Any Fallout
- If there’s any fallout or smudges under your eyes, clean them up using a makeup remover or makeup wipe.
Step 10: Optional: False Eyelashes
- If you want to add even more drama, you can apply false eyelashes.
Remember that practice makes perfect, so don’t be discouraged if your first attempt isn’t flawless. Experiment with different shades and techniques to find the smokey eye look that suits you best.
2. Gold Smokey Eye Makeup Tutorial

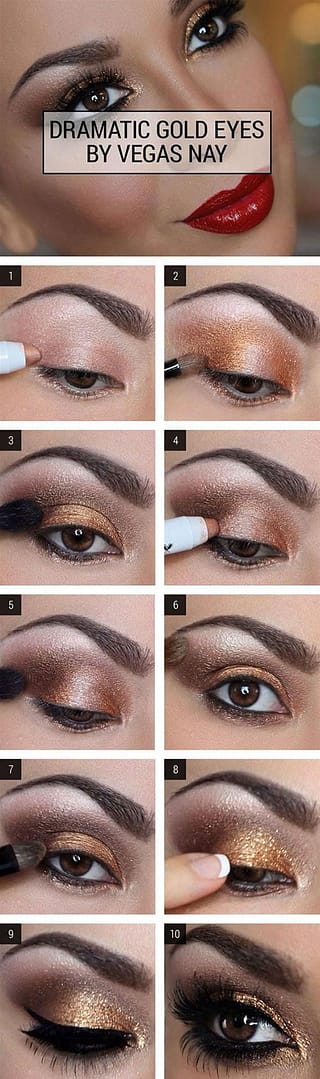
You Will Need
- Primer
- Concealer
- Gold eyeshadow (Cream and powder textures)
- Dark brown eyeshadow
- Black liner
- Fake lashes
- Mascara
- Eyeshadow brushes
How To Apply Gold Smokey Eye Makeup?
Step 1 : Prep, prime and conceal the eyelids. Use a cream gold eyeshadow base. This will make the gold pop out more when you add the powder eyeshadow.
Step 2 : Pack on the gold eyeshadow and blend it with your fingers or a dense or wet brush.
Step 3 : Take a dark brown eyeshadow with a fluffy brush and apply it to the outer corner and take it into the crease to create depth.
Step 4 : Keep applying the gold to the middle of the lid and the brown in the outer corner till you are happy with the intensity.
Step 5 : Apply the gold eyeshadow to the lower lashline. Follow up with black liner on the lower water line as well as the lash line, blending out the edges optionally with brown or black eyeshadow.
Step 6 : Apply eyeliner to the upper lash line and flick it out.
Step 7 : To complete the look, apply fake lashes and finish up with mascara.
You can also use contouring and highlighting to accentuate your facial features and make your eyeshadow stand out.
This is a great holiday look. It also looks fabulous for weddings.
3. Purple Smokey Eye Makeup Tutorial

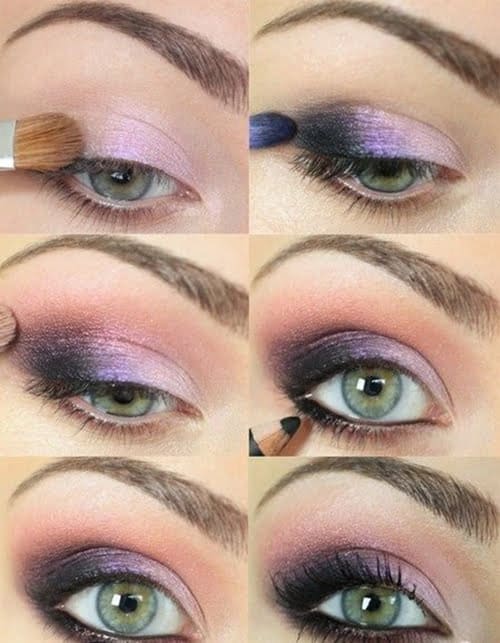
You Will Need
- Primer
- Concealer
- Lilac shimmery eyeshadow
- Black eyeshadow
- Dark purple eyeshadow
- Peachy-pink eyeshadow
- Black liner
- Mascara
- Eyeshadow brushes
How To Apply Purple Smokey Eye Makeup?
Step 1: Begin by applying a shimmery lilac eyeshadow as your initial base color.
Step 2: Next, pack on some black eyeshadow to the outer corner and ensure a seamless blend, eliminating any harsh lines.
Step 3: Utilize a slightly darker shade of purple in the center of your eyelid to create a smooth transition between the lilac and black eyeshadows. Be sure to blend for a flawless look.
Step 4: Locate a peachy-pink shade and use a fluffy brush to apply it just above the crease. This technique provides a natural gradient effect.
Step 5: Apply kohl or eyeliner along your lower lash line and gently smudge it to achieve the desired smokey effect.
Step 6: Tightline your upper waterline to enhance the fullness of your lashes.
Step 7: Finish the look by applying mascara, and there you have it – your purple smokey eye is complete!
It’s important to note that a common misconception about smokey eyes is that they must be intense. However, this look incorporates lighter colors, and even the black isn’t overly bold. You can confidently wear this makeup during the daytime for activities like shopping or pair it with a charming sundress for a brunch outing.
4. Bronze Smokey Eye Makeup Tutorial

You Will Need
- Primer
- Concealer
- Bronze eyeshadow
- Dark brown eyeshadow
- Nude eyeliner
- Gold eyeliner or eyeshadow
- Mascara
How To Apply Bronze Smokey Eye Makeup?
Step 1: Begin by applying a bronze eyeshadow all over your eyelid.
Step 2: Take some of the same bronze eyeshadow and apply it along your lower lash line.
Step 3: Using a liner brush and a dark brown eyeshadow, create a smudged outline as close to the lash line as possible.
Step 4: Repeat the same process for the lower lash line.
Step 5: Enhance the intensity by applying more bronze eyeshadow as needed.
Step 6: To create the illusion of brighter eyes, use a nude eye pencil along the inner corner of your eye. (Note: You can also opt for a nude eye pencil on the waterline instead of black for an eye-opening effect.)
Step 7: Blend out any harsh lines and add eyeshadow where necessary to achieve a seamless look.
Step 8: Add a touch of shimmery highlight to the inner corner of your eyes using a gold eye pencil or eyeshadow.
Step 9: Complete the look by applying several coats of mascara.
This popular celebrity-inspired smokey eye technique is ideal for your prom night or any special occasion.
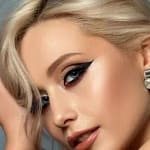
5. Silver Smokey Eye Makeup Tutorial

You Will Need
- Primer
- Concealer
- Cream based silver eyeshadow
- Black eyeliner
- Highlighter
- Mascara
- Eyeshadow brushes
Step 1: Start by applying primer and concealer to prepare the eye. Since silver is a cool-toned shade, it’s essential to neutralize any redness or discoloration.
Step 2: Utilize a silver cream-based eyeshadow on the primed and concealed eyelid.
Step 3: Apply black eyeliner to the outer corner.
Step 4: Blend it towards the middle and into the crease.
Step 5: Line the upper and lower lash lines with black eyeliner.
Step 6: Smudge it out to create the smokey effect.
Step 7: Highlight the brow bone and inner corner using a highlighter.
Step 8: If necessary, intensify the silver color by adding more product.
Step 9: Blend it evenly to ensure a seamless transition.
Step 10: Finish the look with mascara, and you’re done!
This tutorial guides you through creating a captivating silver smokey eye while maintaining proper grammar and clarity.
Related: How To Do Halo Eye Makeup
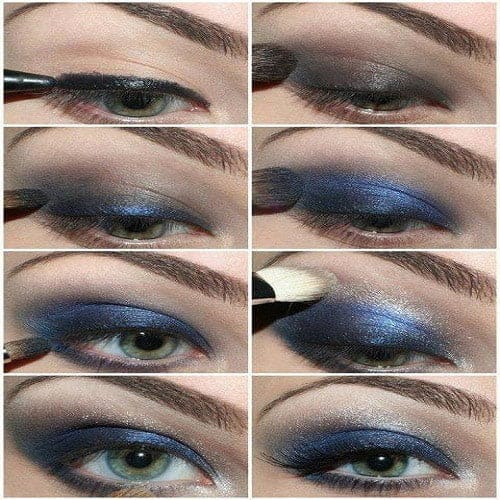
6. Blue Smokey Eye Makeup Tutorial

You Will Need
- Primer
- Concealer
- Black eyeliner
- Metallic blue eyeliner. kohl or eye shadow
- Silver eyeshadow
- Mascara
- Fake lashes
- Eyeshadow brushes
How To Apply Blue Smokey Eye Makeup?
Step 1: Start with a freshly concealed and primed eyelid. Apply a generous layer of eyeliner to create the initial base for your smoky eye.
Step 2: Gently smudge the eyeliner into the crease and slightly above it to ensure a smooth, blended transition without any harsh lines.
Step 3: Introduce the vibrant blue color to your look. You can use a metallic blue eye pencil, kohl liner, or a pigmented blue eyeshadow. Apply it evenly across your eyelid.
Step 4: Blend the blue shade thoroughly, ensuring it seamlessly transitions into the black base created earlier. Avoid crossing over the black line; aim for a smooth gradient effect.
Step 5: Extend the blue shade to the lower lash line and smudge it to unify the smoky appearance.
Step 6: Add a touch of silver eyeshadow slightly above the crease to enhance the overall look.
Step 7: Carefully blend all the shades to create a seamless and well-blended finish. Add more product if needed to achieve the desired intensity.
Step 8: Complete the look by applying mascara to your lashes for added volume, consider using false eyelashes for extra drama, and add a hint of glitter for that glamorous touch.
This step-by-step guide will help you achieve a stunning smoky eye makeup look.
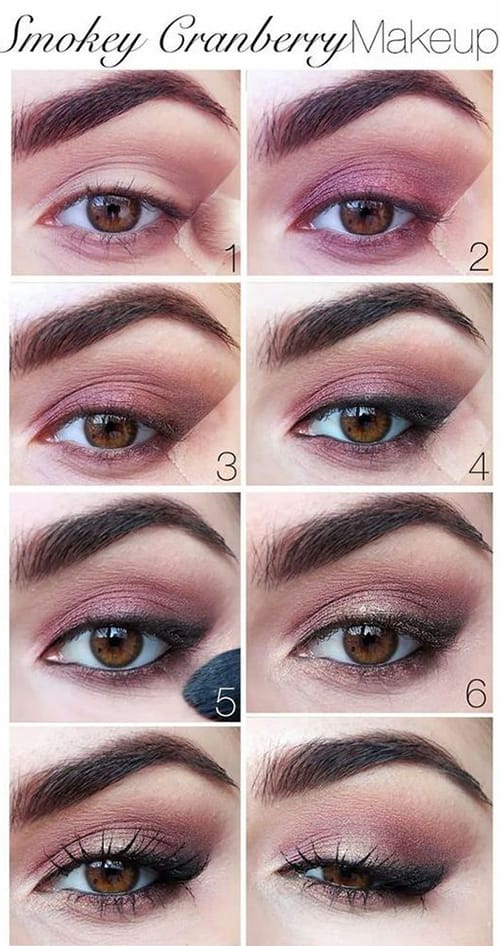
7. Pink Smokey Eye Makeup Tutorial

You Will Need
- Primer
- Concealer
- Tape
- Pink / Cranberry eyeshadow
- Black eyeliner
- Rose gold eyeshadow
- Mascara
How To Apply Pink Smokey Eye Makeup?
Step 1: Begin with a clean slate, ensuring your eyelids are free of any prior makeup. To create a defined shape, strategically place a strip of tape along the lower lash line, following its natural contour.
Step 2: Now, opt for a metallic pink eyeshadow, perhaps even a cranberry shade, and gently sweep it across your eyelids. Don’t forget to lightly blend any excess eyeshadow beneath your eyes for a cohesive look.
Step 3: Apply a precise line of black eyeliner, starting near the upper lash line and gradually thickening it as you move towards the outer corner of your eye.
Step 4: To achieve a smoky effect, expertly smudge and blend the eyeliner, seamlessly merging it with the pink eyeshadow. Extend a touch of eyeliner along the lower lash line for added allure.
Step 5: With precision, remove the tape, effortlessly softening any harsh lines that may have formed.
Step 6: Elevate the overall look by applying a shimmery rose gold eyeshadow to the center of your eyelids. This step introduces dimension and ensures your eyes truly pop.
Step 7: Seal the look with a coat of mascara, and voilà, you’re ready to dazzle!
This makeup style is not only incredibly soft but also versatile, making it suitable for various occasions, including milestone events like your graduation ceremony. It’s even office-appropriate, allowing you to showcase your style while maintaining professionalism.
8. Green Smokey Eye Makeup Tutorial


You Will Need
- Primer
- Concealer
- Black gel eyeliner
- Emerald green eyeshadow
- Gold-brown eyeshadow
- Shimmery black eyeshadow
- Gold eyeshadow
- Mascara
- Fake lashes(Optional)
How To Apply Green Smokey Eye Makeup?
Step 1: Begin by preparing your eyelids through the application of primer and concealer. Don’t forget to define your brows as a strong brow game complements the entire smokey look.
Step 2: Apply black eyeliner generously to both the upper and lower lash lines. Focus on adding more liner to the upper lash line and lid, as this will serve as the foundation for your smokey eye.
Step 3: Expertly smudge and blend the eyeliner to achieve a seamless and well-blended appearance.
Step 4: Introduce an emerald green eyeshadow into the mix by applying it to the crease and slightly above. Use a fluffy brush to ensure smooth transitions. Extend the green shade to the lower lash line as well.
Step 5: Utilize a brown shade with warm yellow-gold undertones to apply just above the crease. This acts as an excellent transition shade, creating a harmonious flow from your skin to the eyeshadow.
Step 6: Enhance the intensity at the center of the eyelid by adding more black. Consider using a gel-based product for a deep, dark effect, such as a gel eyeliner.
Step 7: Set the black gel with a shimmery black eyeshadow. Ensure it’s applied under the eyes as well to maintain a cohesive look.
Step 8: Add a touch of gold shimmer eyeshadow to the inner corners of your eyes to create a luminous highlight.
Step 9: Finish the look with an intense black mascara and optionally, false lashes, to achieve this captivating green smokey eye!
This eye-catching makeup style is perfect for all-night events, whether you’re attending nighttime parties or enjoying a night out with your friends at a club. It’s bound to make you stand out and turn heads.
9. Black and Gold Smokey Eye Makeup Tutorial


You Will Need
- Primer
- Concealer
- Black eyeliner
- Gold eyeshadow
- Black liquid liner
- False lashes
- Mascara
- Makeup burshes
How To Apply Black and Gold Smokey Eye Makeup?
Step 1: Start by creating a captivating gold and black smokey eye. Begin with a clean canvas, ensuring your eyelids are free of any prior makeup. Apply a generous amount of black eyeliner, starting from the outer corner and extending towards the crease.
Step 2: Employ an eyeshadow brush to expertly blend the black liner. This black shade will lend depth and dimension to your smokey eye. Extend a touch of black along the lower lash line and smudge it for a harmonious effect.
Step 3: Once the black is seamlessly blended, intensify your look by layering on the lustrous gold eyeshadow.
Step 4: Blend the gold eyeshadow into the black near the outer corner of your eye, creating a captivating transition.
Step 5: Extend the gold eyeshadow to the inner corner and gently along the beginning of the lower lash line. Skillfully blend it with the black, yielding a captivating ombre effect.
Step 6: Elevate the look by applying eyeliner to create a stylish flick.
Step 7: Conclude your glamorous look by adding false eyelashes and a coat of mascara. Voila! You’re ready to shine at special events and weddings.
This dramatic makeup style is perfect for making a statement at various occasions, particularly for events and weddings where you want to leave a lasting impression.
Related: Simple Gold Eye Makeup Tutorial
10. Pink and Gray Smokey Eye Makeup Tutorial

You Will Need
- Primer
- Concealer
- Dark brown eyeshadow
- Pink eyeshadow
- White eyeshadow with pink undertones
- Black liquid liner
- Black lashes
- Black eyeliner
- False lashes
- Mascara
How To Apply Pink and Gray Smokey Eye Makeup?
Step 1: Start with freshly primed and concealed eyelids as your base. Apply a cool-toned medium brown eyeshadow shade to the outer corner and blend it into the crease for a seamless transition.
Step 2: Using a pink eyeshadow, apply it generously to the eyelid, leaving the center of the eyelid untouched.
Step 3: Next, fill the empty center space with a soft white shade that carries subtle pink undertones. This step adds depth and dimension to your eye makeup.
Step 4: If you don’t have a separate highlighter, use the same shade to highlight the browbone for a lifted effect.
Step 5: Apply eyeliner and craft a stylish flick. Extend a pencil liner along the lower lash line and expertly smudge it out for a smoky touch.
Step 6: Enhance the look by intensifying the center of the eyelid with a shimmery white eyeshadow, adding a touch of radiance.
Step 7: For added elegance, adorn your eyes with false lashes. Highlight the inner corner of your eyes, and consider extending this highlight slightly towards the inner one-third of the eyelid. This subtle sparkle will beautifully enhance your eyes.
That’s all there is to it! This soft and versatile look can be worn confidently even during daytime events.
Smokey Eye Make
1. Start with a Fresh Canvas: Prior to makeup application, ensure your face is freshly cleansed and free from excess oils. A clean canvas helps makeup adhere better and achieve a flawless finish.
2. Use Clean Brushes: The cleanliness of your makeup brushes is paramount. Clean brushes not only deposit colors more effectively but also blend seamlessly for a polished look.
3. Choose Wisely: When selecting a smokey makeup look, consider the occasion. Opt for lighter and more subtle smokey eye makeup for daytime events, reserving the bold, dark smokey eyes for nighttime affairs or significant events where such makeup is fitting.
4. Balance is Key: If you decide to go bold with a heavy eye makeup look, balance it out by opting for nude or neutral shades on the lips. This ensures a harmonious and well-balanced overall appearance.
By following these makeup tips, you’ll not only achieve a flawless look but also make informed decisions based on the occasion and achieve a well-balanced makeup style.
Quick Tips
Opt for Finger Blending with Cream Eyeshadows: When working with cream eyeshadows, consider using your fingertips for blending instead of brushes. This technique helps achieve a more even and seamless finish.
Infographic: 4 Classic Smokey Eye Looks To Try
Explore a Range of Smokey Eye Looks: Whether you’re a fan of dramatic flair or prefer a more subtle approach, we have a variety of smokey eye makeup looks to suit your style. If you’re unsure about which look to choose, we’ve curated the top four timeless smokey eye makeup looks that effortlessly complement any outfit and occasion. For more details, refer to the infographic below.

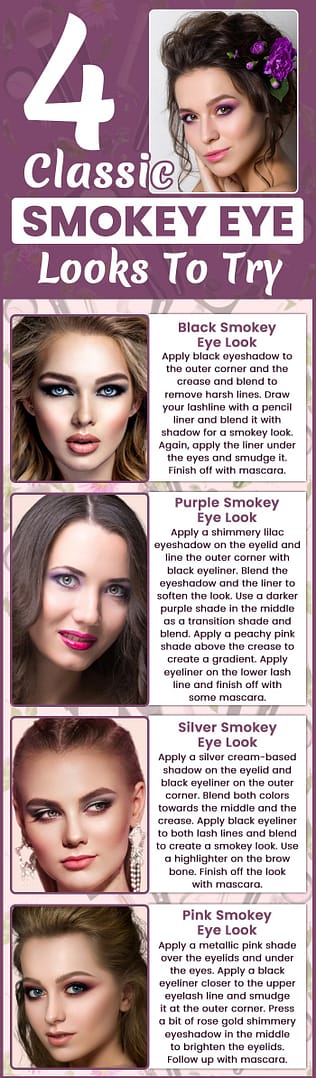
This way, you can easily discover the perfect smokey eye look to enhance your beauty and make a statement
Frequently Asked Questions
1. Do smokey eyes suit everyone?
2. Do smokey eyes make you look older?
3. What eye shape is most enhanced with smokey eye makeup?
Key Takeaways
- Smokey eye makeup can lend a bold and glamorous appearance to your eyes. It’s a versatile technique that can incorporate various colors, such as black, gold, rose, pink, or gray, and can be adapted to suit different eye shapes.
- When blending eyeshadow, employing a fluffy brush is key. Completing the smokey eye look typically involves the use of mascara, eyeliner, and highlighter.
- It’s advisable to reserve deep, dark smokey eye colors for nighttime events or special occasions where they are most fitting and impactful.